Round 1. Warm a plate in the microwave. Place and melt hershey kiss bottoms on warm plate. Place on cookies. Let rest.
Round 2. Warm plate again. Melt chocolate chips and place on opposite side. Let rest. [be careful. the plate was a little too warm for the chocolate chips. I had to take another swipe at round 2. let the plate cool a bit before placing the smaller chocolate pieces.]
I have pears, freshly picked from an Eastern Washington orchard, and desperately want to use them before they go bad. I came across this recipe for Quick Pear Ginger Crisps. It took less than 15 minutes to prepare and most of that time was spent peeling the pears. It calls for ginger snap cookies, walnuts, brown sugar and pears. Other than the cookies and the walnuts, everything else is in your pantry.
The recipe uses canned pears in heavy syrup, so I substituted 4 fresh pears, 1 Tb. all-purpose flour, 1 tsp sugar, 1 tsp cinnamon.
Divide pears into ramekins and top with chopped ginger snaps, walnuts and brown sugar-with a dollop of butter on top. Bake at 350 degrees for 15 minutes.
A scoop of vanilla bean ice cream when it is still warm perfects it! I think the crunch of the cookies on top was my favorite part.
**My version is actually gluten and dairy free [sans the ice cream, of course} It is naturally dairy free and I used Pamela’s Ginger Mini Snapz and gluten free flour. Believe me when I tell you, you can’t tell the difference.
My new fascination with small single serving desserts continues. After my post about espresso mousse in tiny mason jars, my sister-in-law gave me a tip for another fun idea.
Single serving chocolate chip cookies…in a jar! A Pazookie. I recently made them for my son’s birthday. [They hold a candle perfectly! Great birthday dessert.] Simply make your favorite chocolate chip cookie recipe, fill 4oz mason jars 1/2 full with dough, and bake them at 375 degrees for about 15 minutes. You can let them cool completely or serve while warm with a scoop of really good vanilla ice cream on top. The outside is crisp but the inside is gooey goodness. Low labor, huge impact!
The love of Nutella in our home has been well documented. [read more about our obsession here]. And now I have one more way to use this deliciously, smooth cupboard staple. Preschool is almost out for summer, with two extra weeks of mornings (and afternoons) to fill up. Thinking my little guy and I will try making these self-frosting Nutella cupcakes.
I am a total sucker for a frosted sugar cookie. I love baking them, and find every excuse to bust out the cookie cutters. Hey, hey-it’s Valentine’s Day! My little boys and I cut two pans of cookies last night and lovingly frosted them. We keep our frosting and decorating super simple. Icing and colored sugars. (Anything more complicated and I get frustrated..which ruins all my fun.)
I do have the MOST amazing recipe-which I will share with you. It comes straight from the domestic-goddess herself. Who else? Martha Stewart. I have two tips which should ensure the perfectly baked cookie. First, roll your dough thick-approximately 1/2″. If they are too thin, they turn out crispy. Secondly, don’t over bake them. Watch them carefully and pull them out of the oven when the bottom edges are just golden.
The Basic Sugar Cookie (with a few tips)- from Everyday Food | Holiday ’06
2 cups flour
½ tsp. Baking powder
¼ tsp. Salt
1 stick butter (room temperature)
1 cup sugar
1 egg
1 tsp. Vanilla extract
Whisk together flower, baking powder and salt. In mixer, beat butter and sugar. Beat in egg and vanilla. With mixer on low, add dry ingredients gradually. Beat until combined. Divide dough in half; flatten into disks. Wrap each disk in plastic. Freeze until firm-at least 20 minutes (or refrigerate overnight).
Preheat oven to 350 degrees. Remove dough and let stand for 10 minutes. Roll dough and cut out shapes on floured surface. (First tip is to roll dough thick. This makes softer cookies.) Bake for 10-18 minutes. (Second tip is to pull cookies from oven when edges are JUST golden. You don’t want to over bake your cookies.)
Easy icing:
1 ½ cups powdered sugar
3-4 Tbs. Milk.
Whisk together. Add food coloring if you would like. Frost cookies and let set, about 20 minutes.
**If you don’t like to bake or just short on time, order the GORGEOUS cookies pictured above from the Etsy shop, Sugar Me Desserterie **
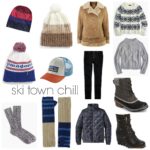
What does one do when home with the children for 7 (unplanned) days straight? Bake. Came across this recipe third hand (from blog, to blog, to blog to ME!). I could not resist it and picked up the essential ingredients to whip up a batch today. And just in time to take them along to the ski hill tomorrow.
salted brown butter krispie treats
**The following deliciousness is direct from smitten kitchen **
What’s different about these? Oh, just a bit more (coughdouble) butter which you toast until it’s brown and nutty and help along with some coarse salt, just minor things. But it changes everything.
Makes 16 2-inch squares or 32 1- x 2-inch small bars
1 stick unsalted butter, plus extra for the pan
1 10-ounce bag marshmallows
Heaping 1/4 teaspoon coarse sea salt
6 cups Rice Krispies cereal (about half a 12-ounce box)
Butter (or coat with non-stick spray) an 8-inch square cake pan with 2-inch sides.
In a large pot, melt butter over medium-low heat. It will melt, then foam, then turn clear golden and finally start to turn brown and smell nutty. Stir frequently, scraping up any bits from the bottom as you do. Don’t take your eyes off the pot as while you may be impatient for it to start browning, the period between the time the butter begins to take on color and the point where it burns is often less than a minute.
As soon as the butter takes on a nutty color, turn the heat off and stir in the marshmallows. The residual heat from the melted butter should be enough to melt them, but if it is not, turn it back on low until the marshmallows are smooth.
Remove the pot from the stove and stir in the salt and cereal together. Quickly spread into prepared pan. I liked to use a piece of waxed or parchment paper that I’ve sprayed with oil to press it firmly and evenly into the edges and corners, though a silicon spatula works almost as well.
Let cool, cut into squares and get ready to make new friends.